Building Phone Verification or Two Factor Authentication(2FA) is complicated and time-consuming. I had to spend around a month building one by myself. Even if we can build it in-house, there could be many issues such as deliverability, security flaws, etc., because we are not experts in that domain. How about using an API and implement 2FA into your app in just 15 minutes?
Twilio Verify
It’s an API from Twilio that solves complex development challenges of 2FA so you can focus on core business functionalities.
Overview
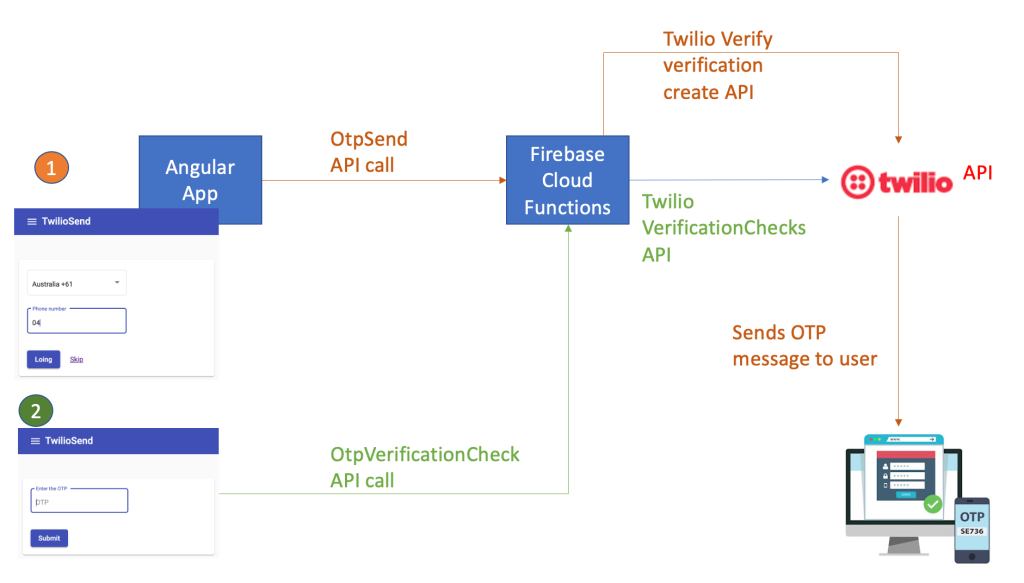
1. Send OTP
OTP – One Time Password
You can use any server side service to trigger the Twilio Verify API. I used Firebase for this example. Twilio also has serverless functions that you can use for this.
Create your angular app. Add a component to capture the phone number.
Get the code from my Github repo: https://github.com/mliyanage/twilio-send
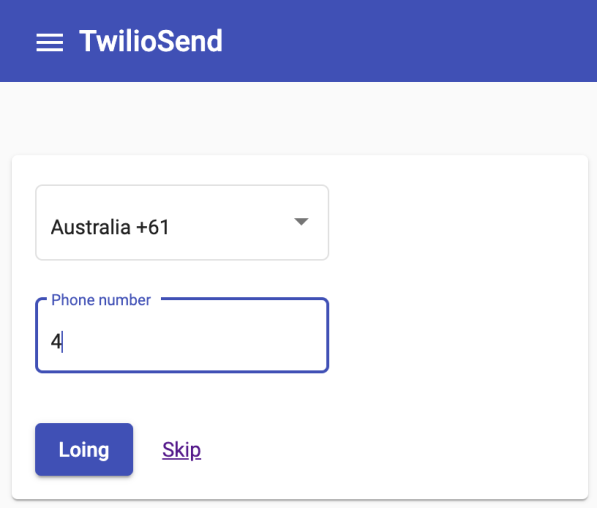
Call the Auth service OtpSend method and pass the phone number. Phone numbers should be validated against the E164 format. I’m optionally checking whether the phone number is already registered in the system by querying the user’s collection.
After calling the API, send the user to the OTP page (go to step 2)
import { Component, OnInit } from '@angular/core';
import { FormGroup, FormControl, Validators } from '@angular/forms';
import { Router } from '@angular/router';
import { AuthService } from '../services/auth.service';
import { UiService } from '../services/ui.service';
import isdcodes from '../../assets/isdcodes.json';

@Component({
  selector: 'app-login',
  templateUrl: './login.component.html',
  styleUrls: ['./login.component.css']
})
export class LoginComponent implements OnInit {

  isProgressVisible: boolean;
  loginForm!: FormGroup;
  firebaseErrorMessage: string;
  isdCodelist: {dial_code:string, name:string}[] = isdcodes;

  constructor(private authService: AuthService, private router: Router, private uiService:UiService) {
    this.isProgressVisible = false;
    this.firebaseErrorMessage = '';
}

  ngOnInit(): void {
    this.loginForm = new FormGroup({
      'isdCodes': new FormControl('', [Validators.required]),
      'phone': new FormControl('', [Validators.required])

  });
  }

  login() {
    if (this.loginForm.invalid)
        return;

    const phoneNo = this.loginForm.value.isdCodes+this.loginForm.value.phone;
    //Validate E164 format
    let regexPhone = new RegExp(/^\+[1-9]\d{10,14}$/);
    if (!regexPhone.test(phoneNo))
    {
      this.uiService.showSnackBar("Invalid phone number",null,300);
      return;
    }

    this.isProgressVisible = true;

    this.authService.getUserByPhone(phoneNo).subscribe(
      (data) => {
        this.authService.otpSend(phoneNo).subscribe((res)=>{
          this.uiService.showSnackBar("Otp has been sent",null,300);
          this.router.navigate(['/otp']);
        })
      },
      (err) => {
        this.isProgressVisible = false;
        this.uiService.showSnackBar("User does not exists, please sign up",null,300);
      }
    );

}

}
Add a service to your angular app to invoke HTTP functions.
Here I have services for send OTP, Verify OTP, Sign up a new user, and get existing users by phone number.
I used Angular Material Snack-bar to show messages. There is another service called uiService for this. You can check out the complete code for that.

import { Injectable } from '@angular/core';
import { AngularFirestore, AngularFirestoreDocument } from '@angular/fire/firestore';
import { Router } from '@angular/router';
import { UiService } from './ui.service';
import { HttpClient } from '@angular/common/http';
import { environment } from '../../environments/environment';
import { Observable } from 'rxjs';


@Injectable({
  providedIn: 'root'
})
export class AuthService {
  private baseUrl = environment.baseUrl;
  userLoggedIn: boolean;


  constructor(private router: Router, private angularFirestore: AngularFirestore, private uiService: UiService, private http:HttpClient) {
        this.userLoggedIn = false;
  }

	getUserByPhone(phone: string):Observable<any> {
	  const phoneNo = phone.substring(1); //without + prefix
	  return this.angularFirestore.doc('users/' + phoneNo).snapshotChanges();
	}

	otpSend(phone: string): Observable<any> {

	  return this.post("/otpSend",{"phone":phone})
	}

	otpVerificationCheck(otp: string): Observable<any> {
	  const phone = this.readFromLocal("phone");
	  return this.post("/otpVerificationCheck",{"phone":phone, "otp": otp})
	}

	signupUser(user: any): Promise<any> {
	      return this.angularFirestore.doc('/users/' + user.phone.substring(1))
	      .set({
	          displayName: user.displayName,
	          phone: user.phone,
	      }).then((result)=>{
	        this.uiService.showSnackBar("You will get an OTP",null,300);
	        this.saveIntoLocal("phone",user.phone)
	      }).catch(error => {
	        this.uiService.showSnackBar("Sign up failed, try again later",null,300);
	  });
	}
}
Next, Cloud Functions to Send the OTP and Verify the OTP. To send, you have to use
Refer to the documentation for other languages like C#, PHP, Ruby, Python, Java, etc.
Here I have three functions:
otpSend – this will be called from the front-end to send an OTP to the user
otpVerificationCheck – this will be called from the front-end to verify the OTP entered by the user
onUserCreate – this is the CloudFirestore trigger that I have used to send an OTP when a new user is signed up. When a new document is created in the user’s collection, this function will be invoked. Sign-up functionality is not covered in this post. You can check the code from the Github repo.
const functions = require("firebase-functions");
const admin = require('firebase-admin');
const accountSid = functions.config().twilio.sid;
const authToken = functions.config().twilio.token;
const serviceId = functions.config().twilio.serviceid;
const client = require('twilio')(accountSid, authToken);
const cors = require('cors');

admin.initializeApp();

const db = admin.firestore();

//Send an OTP to new user
exports.onUserCreate = functions.firestore.document('users/{phone}').onCreate(async(snap, context)=>{
    const values = snap.data();
    //Send OTP
    await db.collection('message-log').add({description: `OTP has been sent to user to:${values.phone} `});
    client.verify.services(serviceId)
             .verifications
             .create({to: values.phone, channel: 'sms'})
             .then(verification => console.log(verification.status));

})

//Validate the OTP
exports.otpVerificationCheck = functions.https.onRequest(async (req, res) => { cors()(req, res, () => {
    // Check for POST request
    if(req.method !== "POST"){
        res.status(400).send('Please send a POST request');
        return;
    }
    const msgStatus = req.body;
    client.verify.services(serviceId)
      .verificationChecks
      .create({to: msgStatus.phone, code: msgStatus.otp})
      .then(verification_check => res.json({result: verification_check.status}));

  });
});

 //Send a new OTP
 exports.otpSend = functions.https.onRequest(async (req, res) => { cors()(req, res, () => {
    // Check for POST request
    if(req.method !== "POST"){
        res.status(400).send('Please send a POST request');
        return;
    }
    const request = req.body;
    const resp = client.verify.services(serviceId)
             .verifications
             .create({to: request.phone, channel: 'sms'})
             .then(otp => res.json({result: otp}));

 });
});
2. Verify OTP
Add a component to capture the OTP from the user.


import { Component, OnInit } from '@angular/core';
import { FormGroup, FormControl, Validators } from '@angular/forms';
import { Router } from '@angular/router';

import { AuthService } from '../services/auth.service';
import { UiService } from '../services/ui.service';

@Component({
  selector: 'app-otp',
  templateUrl: './otp.component.html',
  styleUrls: ['./otp.component.css']
})
export class OtpComponent implements OnInit {

  isProgressVisible: boolean;
  otpForm!: FormGroup;

  constructor(private authService: AuthService, private router: Router, private uiService:UiService) {
    this.isProgressVisible = false;

}

  ngOnInit(): void {
    this.otpForm = new FormGroup({
      'otpValue': new FormControl('', Validators.required)
  });
  }

  validateOTP(){
    this.isProgressVisible = true;
    this.authService.otpVerificationCheck(this.otpForm.value.otpValue).subscribe(
      (data) => {
        this.isProgressVisible = false;
        this.router.navigate(['/home']);
      },
      (err) => {
        this.isProgressVisible = false;
        this.uiService.showSnackBar("OTP Validation failed",null,300);
      }
    );
  }
}
Upon submit, call the otpVerificationCheck of the Auth service, and that will trigger the cloud function to invoke the Twilio verification check API to validate the OTP.
If it returns success, you can send the user to the restricted log-in area of the application. You have to implement Angular Auth guard for this.