Home Cloud
Category:

Cloud

Building Phone Verification or Two Factor Authentication(2FA) is complicated and time-consuming. I had to spend around a month building one by myself. Even if we can build it in-house, there could be many issues such as deliverability, security flaws, etc., because we are not experts in that domain. How about using an API and implement 2FA into your app in just 15 minutes?

Twilio Verify

It’s an API from Twilio that solves complex development challenges of 2FA so you can focus on core business functionalities.

Overview

1. Send OTP

OTP – One Time Password

You can use any server side service to trigger the Twilio Verify API. I used Firebase for this example. Twilio also has serverless functions that you can use for this.

Create your angular app. Add a component to capture the phone number.

Get the code from my Github repo: https://github.com/mliyanage/twilio-send

Call the Auth service OtpSend method and pass the phone number. Phone numbers should be validated against the E164 format. I’m optionally checking whether the phone number is already registered in the system by querying the user’s collection.
After calling the API, send the user to the OTP page (go to step 2)

import { Component, OnInit } from '@angular/core';
import { FormGroup, FormControl, Validators } from '@angular/forms';
import { Router } from '@angular/router';
import { AuthService } from '../services/auth.service';
import { UiService } from '../services/ui.service';
import isdcodes from '../../assets/isdcodes.json';

@Component({
  selector: 'app-login',
  templateUrl: './login.component.html',
  styleUrls: ['./login.component.css']
})
export class LoginComponent implements OnInit {

  isProgressVisible: boolean;
  loginForm!: FormGroup;
  firebaseErrorMessage: string;
  isdCodelist: {dial_code:string, name:string}[] = isdcodes;

  constructor(private authService: AuthService, private router: Router, private uiService:UiService) {
    this.isProgressVisible = false;
    this.firebaseErrorMessage = '';
}

  ngOnInit(): void {
    this.loginForm = new FormGroup({
      'isdCodes': new FormControl('', [Validators.required]),
      'phone': new FormControl('', [Validators.required])
      
  });
  }

  login() {
    if (this.loginForm.invalid)
        return;

    const phoneNo = this.loginForm.value.isdCodes+this.loginForm.value.phone;
    //Validate E164 format
    let regexPhone = new RegExp(/^\+[1-9]\d{10,14}$/);
    if (!regexPhone.test(phoneNo)) 
    {
      this.uiService.showSnackBar("Invalid phone number",null,300);
      return;
    }

    this.isProgressVisible = true;

    this.authService.getUserByPhone(phoneNo).subscribe(
      (data) => {
        this.authService.otpSend(phoneNo).subscribe((res)=>{
          this.uiService.showSnackBar("Otp has been sent",null,300);  
          this.router.navigate(['/otp']);
        })
      },
      (err) => {
        this.isProgressVisible = false; 
        this.uiService.showSnackBar("User does not exists, please sign up",null,300);
      }
    );
   
}

}
Add a service to your angular app to invoke HTTP functions.
Here I have services for send OTP, Verify OTP, Sign up a new user, and get existing users by phone number.
I used Angular Material Snack-bar to show messages. There is another service called uiService for this. You can check out the complete code for that.

import { Injectable } from '@angular/core';
import { AngularFirestore, AngularFirestoreDocument } from '@angular/fire/firestore';
import { Router } from '@angular/router';
import { UiService } from './ui.service';
import { HttpClient } from '@angular/common/http';
import { environment } from '../../environments/environment';
import { Observable } from 'rxjs';


@Injectable({
  providedIn: 'root'
})
export class AuthService {
  private baseUrl = environment.baseUrl;
  userLoggedIn: boolean;


  constructor(private router: Router, private angularFirestore: AngularFirestore, private uiService: UiService, private http:HttpClient) {
        this.userLoggedIn = false;
  }

	getUserByPhone(phone: string):Observable<any> {
	  const phoneNo = phone.substring(1); //without + prefix
	  return this.angularFirestore.doc('users/' + phoneNo).snapshotChanges();
	}
	
	otpSend(phone: string): Observable<any> {
	 
	  return this.post("/otpSend",{"phone":phone})
	}
	
	otpVerificationCheck(otp: string): Observable<any> {
	  const phone = this.readFromLocal("phone");
	  return this.post("/otpVerificationCheck",{"phone":phone, "otp": otp})
	}

	signupUser(user: any): Promise<any> {
	      return this.angularFirestore.doc('/users/' + user.phone.substring(1))  
	      .set({
	          displayName: user.displayName,
	          phone: user.phone,
	      }).then((result)=>{
	        this.uiService.showSnackBar("You will get an OTP",null,300);
	        this.saveIntoLocal("phone",user.phone)
	      }).catch(error => {
	        this.uiService.showSnackBar("Sign up failed, try again later",null,300);
	  });
	}
}

Next, Cloud Functions to Send the OTP and Verify the OTP. To send, you have to use

Refer to the documentation for other languages like C#, PHP, Ruby, Python, Java, etc.

Here I have three functions:

otpSend – this will be called from the front-end to send an OTP to the user

otpVerificationCheck – this will be called from the front-end to verify the OTP entered by the user

onUserCreate – this is the CloudFirestore trigger that I have used to send an OTP when a new user is signed up. When a new document is created in the user’s collection, this function will be invoked. Sign-up functionality is not covered in this post. You can check the code from the Github repo.

const functions = require("firebase-functions");
const admin = require('firebase-admin');
const accountSid = functions.config().twilio.sid;
const authToken = functions.config().twilio.token;
const serviceId = functions.config().twilio.serviceid;
const client = require('twilio')(accountSid, authToken);
const cors = require('cors');

admin.initializeApp();

const db = admin.firestore();

//Send an OTP to new user
exports.onUserCreate = functions.firestore.document('users/{phone}').onCreate(async(snap, context)=>{
    const values = snap.data();
    //Send OTP
    await db.collection('message-log').add({description: `OTP has been sent to user to:${values.phone} `});
    client.verify.services(serviceId)
             .verifications
             .create({to: values.phone, channel: 'sms'})
             .then(verification => console.log(verification.status));

})

//Validate the OTP
exports.otpVerificationCheck = functions.https.onRequest(async (req, res) => { cors()(req, res, () => {
    // Check for POST request
    if(req.method !== "POST"){
        res.status(400).send('Please send a POST request');
        return;
    }
    const msgStatus = req.body;
    client.verify.services(serviceId)
      .verificationChecks
      .create({to: msgStatus.phone, code: msgStatus.otp})
      .then(verification_check => res.json({result: verification_check.status}));
      
  });
});

 //Send a new OTP
 exports.otpSend = functions.https.onRequest(async (req, res) => { cors()(req, res, () => {
    // Check for POST request
    if(req.method !== "POST"){
        res.status(400).send('Please send a POST request');
        return;
    }
    const request = req.body;
    const resp = client.verify.services(serviceId)
             .verifications
             .create({to: request.phone, channel: 'sms'})
             .then(otp => res.json({result: otp}));
            
 });
});
2. Verify OTP
Add a component to capture the OTP from the user.


import { Component, OnInit } from '@angular/core';
import { FormGroup, FormControl, Validators } from '@angular/forms';
import { Router } from '@angular/router';

import { AuthService } from '../services/auth.service';
import { UiService } from '../services/ui.service';

@Component({
  selector: 'app-otp',
  templateUrl: './otp.component.html',
  styleUrls: ['./otp.component.css']
})
export class OtpComponent implements OnInit {

  isProgressVisible: boolean;
  otpForm!: FormGroup;

  constructor(private authService: AuthService, private router: Router, private uiService:UiService) {
    this.isProgressVisible = false;
  
}

  ngOnInit(): void {
    this.otpForm = new FormGroup({
      'otpValue': new FormControl('', Validators.required)
  });
  }

  validateOTP(){
    this.isProgressVisible = true;
    this.authService.otpVerificationCheck(this.otpForm.value.otpValue).subscribe(
      (data) => {
        this.isProgressVisible = false; 
        this.router.navigate(['/home']);
      },
      (err) => {
        this.isProgressVisible = false; 
        this.uiService.showSnackBar("OTP Validation failed",null,300);
      }
    );
  }
}

Upon submit, call the otpVerificationCheck of the Auth service, and that will trigger the cloud function to invoke the Twilio verification check API to validate the OTP.
If it returns success, you can send the user to the restricted log-in area of the application. You have to implement Angular Auth guard for this.

0 comment
5 FacebookTwitterPinterestEmail
Cloud Migration Planning

Before you migrate your applications to the cloud, you should thoroughly assess why you are moving, the right cloud provider for you, the migration strategy, and the benefits you expect from moving to the cloud.
These are some of the questions that you can ask to assess your current workloads. These questions can be categorized into different areas, so it will be easy for you to identify the right team or person to ask these questions.

Business drivers

This category of questions will help us determine how important the application is for the organization and the clients in terms of revenue, business opportunities, and reputation. The ideal audience to ask these questions are executives, VPs, and product and project managers.

 Is this application critical to your business?

 What is the level of impact of this application failure leading to disruption? Options could be from very high, high, medium, or low.

 Could a failure of this application lead to loss of revenue or business opportunity? What level of impact? Options could be from very high, high, medium, or low.

 Could a failure of this application lead to harm to the company s public image? Define the level of impact.

 Could a failure of this application lead to a loss of customer confidence? Define the level of impact.

 Does the application serve internal or external users?

 Who is this application for?

 Are there SaaS options in the market that might meet your needs with or without customization?

 What is the primary objective to migrate to the cloud for this application?

Provide multichannel access, including mobile and IoT

Enable business agility with continuous innovation

More easily integrate with other web and cloud apps

Leveraging existing investments across tooling, infrastructure, deployed apps, and data

Meet scalability requirements of existing applications more cost-effectively

Free up data centre space quickly

Reduce capital expenditure on existing applications

Achieve rapid time to cloud

 What is the secondary objective to migrate to the cloud for this application?

 How often do you plan to update the app?

 Do you have a pressing timeline (DC shutdown, EoL licensing, DC contract expiration, M&A)?

 If you were to decide on a migration/modernization strategy, which one would you pick?

Rehost – Redeploy the application as-is to the cloud

Refactor – Minimally alter or repackage to take better advantage of the cloud

Rearchitect – Materially change/decompose application to services

Rebuild – New code written with a cloud-native approach

Replace – Move to a SaaS product

Retire – Stop using and investing in the application

Not Sure – There is not enough information yet

 What’re the least efficient aspects of this application?

App Functionality

Cost

Infrastructure

DevOps Processes

Others

Application details

 How many resources have been working on this application for the last year?

 How many significant releases were delivered in the previous year?

 Application Owner’s name

 s this application a custom application or a Commercial Off-the-shelf product?

 What is the application type? Examples: CRM, ERP, Data Analytics, etc.

 Is the application stateful or stateless?

 RTO/RPO requirements

How much maximum downtime can you afford?

How much data loss can you afford?

Are there any cost constraints?

 How old is this application?

 The technology stack of the application

Example: Java, Oracle, .Net, NodeJs etc.

 What’s the expected number of users per month?

 What are the average concurrent users?

 What are the peak times and peak times for concurrent users

 How is the geographical spread of your customers

 What’s the next architectural milestone on your road map for this app?

No change in the architecture

Stateless and use autoscaling

Multi-tier

Microservices

Serverless

 Does this app require you to access the underlying VM (i.e., to install custom software)

 Does this application involve extensive business processes and messaging?

 High network or IOPS?

 Does this application involve custom integration with other web and cloud apps via APIs or connectors?

 What type of communication protocols are used in the application?

 What type of load balancer is used?

 Are you interested in moving your application’s database to the cloud as well?

 Do Bigdata and AI capability required for this application?

 Is this application highly connected with or dependent on on-premises applications/systems?

 What level of changes are you willing to take to move this application to the cloud?

Light – No changes at all – lift and shift.

Moderate – no core code change required but only Minor configuration changes (changing config files, connection strings, etc.)

Extensive – need to re-architect

High – willing to re-code and optimize for cloud leveraging cloud-native services (SQS, SNS, Aurora, DynamoDB, API Gateway)

 Is your app sensitive to latency?

 How is data consumed from this application?

Information Management

Machine Learning

Data Analytics

Classic Storage

 How is this application exposed to external services/applications?

 What is the current (or expected) Service Level Agreement for this application?

 What is the current deployment platform for this application?

 What is the application database provider?

 What is the current backup strategy?

 What are the application monitoring requirements?

 Where are the logs stored? What are the log retention and access policies?

 Is this application multi-tenant?

 What is the current user authentication mechanism used by this application?

 What is the level of deployment process automation for provisioning and configuration for this application?

 What is your process of implementation?

Waterfall

Continuous Delivery

DevOps

Agile Development

 What is the average skill in Cloud technologies and practices within the development team for this application?

 Does your application correspond to a specific workload?

IoT – Internet of Things

Big Data

Big Compute

Microservices & Containers

Streaming and Media Services

 What percentage of the development effort has been spent on maintenance in the last 12 months?

 What is the code-base change percentage in the last 12 months?

Regulatory, compliance, and security requirements

 Are there specific compliance or country-specific data requirements that can impact your migration and architectural

 Does the application need secure authorization and authentication?

 Does the application require a firewall, app gateway, or advanced virtual network and related components?

 What is the CMMI level of the organization?

Read my article on migrating a simple three-tier web app to AWS.

2 comments
4 FacebookTwitterPinterestEmail

This was done in our Multi-region AWS community meetup on 27 Feb 2021.
Watch the recording of the session here: https://youtu.be/pleNadLttD8

Building a web application

I used the code from freecodecamp ASP .Net Core Web application tutorial.

Link to the tutorial : https://www.youtube.com/watch?v=C5cnZ-gZy2I

Source code: https://github.com/bhrugen/BookListRazor/tree/master/BookListRazor

Clone the repository from the Github and build it. You will need Visual Studio 2019 community eddition for this.

If your background is .Net, you can build your own fun project. If you are not from programming background, don’t worry too much about the coding part.

Provision AWS resources

For this exercise, we need a SQL Server Express RDS instance and a Windows Server 2019 EC2 instance.

Create a SQL Server Express RDS instance

https://aws.amazon.com/getting-started/hands-on/create-microsoft-sql-db/

Make sure you have allowed port 1433 on your Security Group from ‘any’ source. (0.0.0.0/0). If you want to connect to your database from your local machine, you have to add this. Or you can allow only your public IP as the source. Google “what’s my IP” to find your public IP.

Allowing DB access from the Internet is NOT a good practice. Normally, you would do this through a VPN connection. This is used only for the demo purpose.

Instead of using RDS, you can use SQL Server Docker image and run it in the same Windows server. But in this case, you may have to choose a bigger EC2 instance like m5.large because the resources in t2.micro will not be enough to run the SQL Docker instance.

You can use SQL Server Management Studio Express to connect to the database. If you are on a Mac, you can use Azure Data Studio for the same.

https://hub.docker.com/r/microsoft/mssql-server-windows-express/

Once you have the DB running, you can run Entity Framework Migrations from your Visual Studio or from .Net Core CLI to create the database table.

https://docs.microsoft.com/en-us/ef/core/managing-schemas/migrations/?tabs=dotnet-core-cli

Create a Windows Server 2019 EC2

https://docs.aws.amazon.com/AWSEC2/latest/WindowsGuide/EC2_GetStarted.html

Allow RDP port in your Security Group for you to connect using a remote desktop from your machine. Again, this is NOT a good practice. Typically, you should be using a VPN or a Bastian host to connect to your machines inside your private subnet.

Setup IIS Web server and configure the web application

Install IIS https://computingforgeeks.com/install-and-configure-iis-web-server-on-windows-server/

Install .Net Core Hosting bundle and create a website on IIS https://docs.microsoft.com/en-us/aspnet/core/tutorials/publish-to-iis?view=aspnetcore-5.0&tabs=visual-studio

Publish your web app

Publish your web application using the folder option. https://docs.microsoft.com/en-us/visualstudio/deployment/quickstart-deploy-to-local-folder?view=vs-2019

Copy the content of the publish folder to the physical path which you assigned to your website on IIS.

You can select the ‘Brows’ option in the IIS manager to see the page in the server itself or you can copy the public IP address or the public DNS from your EC2 instance details section and past it to the browser.

Also, you can assign a DNS (example: https://mywebapp.come) for your web application using Route 53. Watch my video to see how to setup DNS.


0 comment
1 FacebookTwitterPinterestEmail

It is very important to have a personal website to show your work.

OK, but what do I publish on my website because I don’t have anything important to share. And, I am not a good writer. If you feel like this, please read this from Derek Sivers.

First, write something. Think of it as if you are taking notes for yourself. For me, it’s this article on how to publish a website on AWS.
Copy your notes to a simple HTML format and save the file as HTML. Create one more HTML file for the home page and add the hyperlink to the article file.
You can google how to create an HTML file if you don’t know it. Or follow a Youtube tutorial like this or this.

Check the video version of this post here

Buy a domain name

You can buy a domain name from the AWS domain registration option or buy it from namecheap.com. They have many fancy TLD (top-level domains).

Next, create an AWS account. It’s so easy, watch this if you don’t know.

Create an S3 bucket

Go to services and find S3
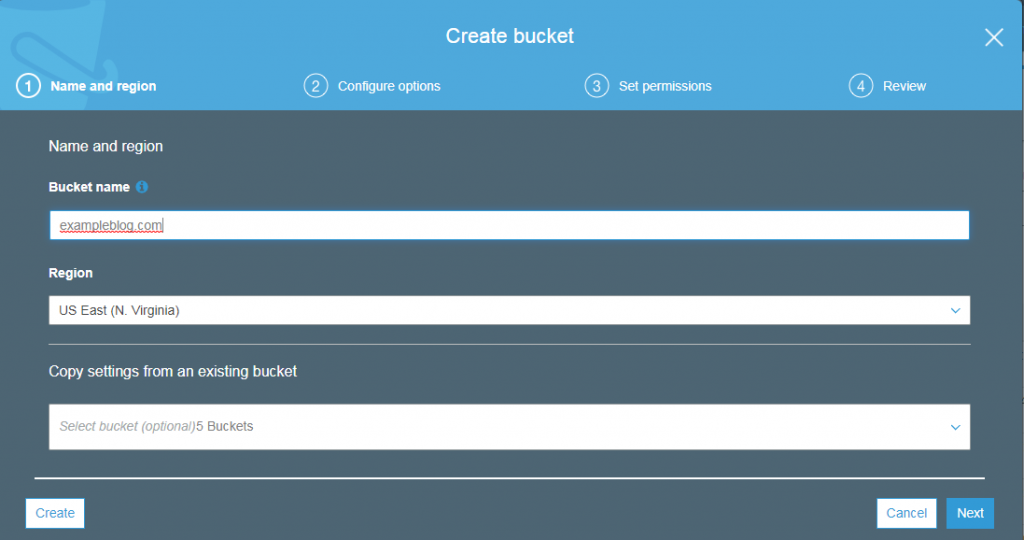
Click on Create bucket

Provide a name for your bucket. Remember, for you to enable S3 hosting via Route 53, you have to provide the bucket name the same as your domain name. For example, if your domain name is exampleblog.com, your bucker name should be exampleblog.com. In my case, I have named it manju.la because my domain name is manju.la

Go to the permissions tab and make sure to off block all public access. If it is on, click on the edit button, and then uncheck block all public access.

Upload your HTML files to the S3 bucket
After you created the bucket, click on the upload button, and then you can drag and drop your HTML files or browse and select your files.
Make files public
Once the files are uploaded, select all the files and select Make public from the Actions drop-down option.

Enable static web hosting
Then go to the properties tab, select Static website hosting.

Select Use this bucket to host a website option. Provide index.html as the index document. Click on save and note the endpoint. You can click on this and see your web page.

If you get access denied error when you browse your URL, go back to properties and check that block all public access is off.

Using Route 53

Now you need a nice name for your website rather than the weird lengthy URL. For that, you must register a domain name. If you don’t know what is a domain name and how DNS work, please check this.

Rout 53 is Amazons Domain Name System(DNS) which translate human readable domain name to machine readable IP addresses. For example amazon.com to 192.0.2.44

Learn more about Reote 53 https://aws.amazon.com/route53/what-is-dns/

Choose Route 53 from the service menu, Network & Content Delivery.

*Note – Route 53 is not free. It will cost you like 0.50$ a month.

Next, create a public hosted zone.
A public hosted zone is a container that holds information about how you want to route traffic on the internet for a specific domain or subdomain.
Inside the hosted zone, we define a set of records to tell AWS where to send traffic from domains or subdomains. In this case, we need to send the traffic to our S3 bucket.
Select “Create hosted zone” from the Route 53 dashboard.
Enter your domain name
Enter the optional description and click on create
Next, create an alias record to point the traffic to the S3
Click on “Create record”
Select Simple routing
Select Define Simple record
Select Alias to S3 website endpoint
Select the region and the S3 bucket (if your S3 bucket does not appear, make sure your S3 bucket name is the same as your domain name)

Click on define simple record

Click on create record

Now, your Route 53 configuration is completed. 

Next, you need to update AWS name servers in your domain name provider. For example, in my case it’s namecheap.com. So I have to update all 4 AWS name servers into the namecheap name servers section. 

Select Namecheap custom domains.

The UI could be slightly different from vendor to vendor, but you get the idea.

It will take some time to propagate this DNS change across the Internet. Sometimes it could take from a couple of minutes up to a day.

Now you can type in your domain name to the browser. If it doesn’t work, it must be a DNS issue, so wait for a little more time.

You also can check whether your domain name is updated or not from DNS lookup services like https://dnslookup.org/ or https://mxtoolbox.com/

After a couple of hours, my DNS started pointing to the correct destination.

0 comment
2 FacebookTwitterPinterestEmail